» Download this section as PDF (opens in a new tab/window)
Nutanix Cloud Clusters (NC2) on Azure provides on-demand clusters running in target cloud environments using bare metal resources. This allows for true on-demand capacity with the simplicity of the Nutanix platform you know. Once provisioned the cluster appears like any traditional AHV cluster, just running in a cloud provider’s datacenter(s).
The solution is applicable to the configurations below (list may be incomplete, refer to documentation for a fully supported list):
Core Use Case(s):
Management interfaces(s):
Supported Environment(s):
Cluster sizing and placement:
Upgrades:
Compatible Features:
The following key items are used throughout this section and defined in the following:
From a high-level the Nutanix Clusters (NC2) Portal is the main interface for provisioning Nutanix Clusters on Azure and interacting with Azure.
The provisioning process can be summarized with the following high-level steps:
The following shows a high-level overview of the NC2 on Azure interaction:
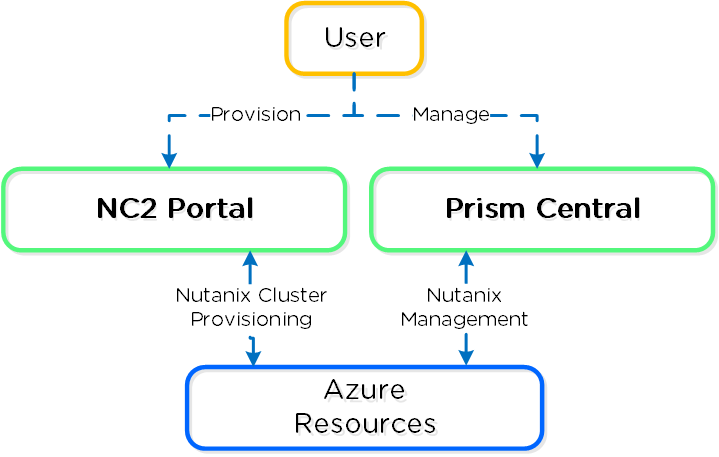 NC2 on Azure - Overview
The following shows a high-level overview of a the inputs taken by the NC2 Portal and some created resources:
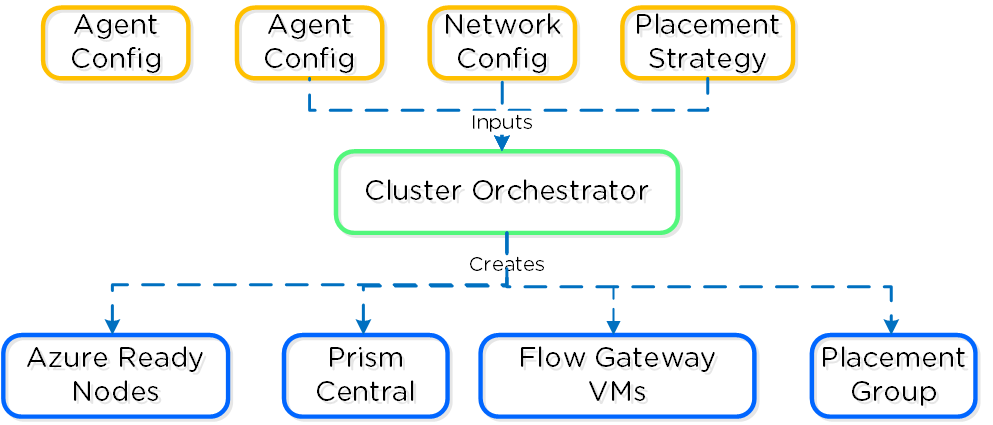 Nutanix Clusters on Azure - Cluster Orchestrator Inputs
Given the hosts are bare metal, we have full control over storage and network resources similar to a typical on-premises deployment. We are consuming Ready Nodes as our building blocks. Unlike AWS, Azure-based nodes are not consuming any additional services for the CVM or AHV.
NC2 on Azure uses a partition placement strategy when it deploys nodes into an Azure availability zone. Azure Fleet Manager places the bare-metal nodes in different Azure racks, and the NC2 console stripes new hosts across those partitions as the cluster grows. When the cluster forms, the partition groups map to the Nutanix rack-awareness feature, so AOS writes data replicas to other racks and keeps data available through a rack failure or planned rack maintenance. Clusters running in Azure are rack-aware by default, and the rack configuration controls in Prism Element are disabled because you have no visibility into the underlying cloud infrastructure.
The following shows a high-level overview of the partition placement strategy and host striping:
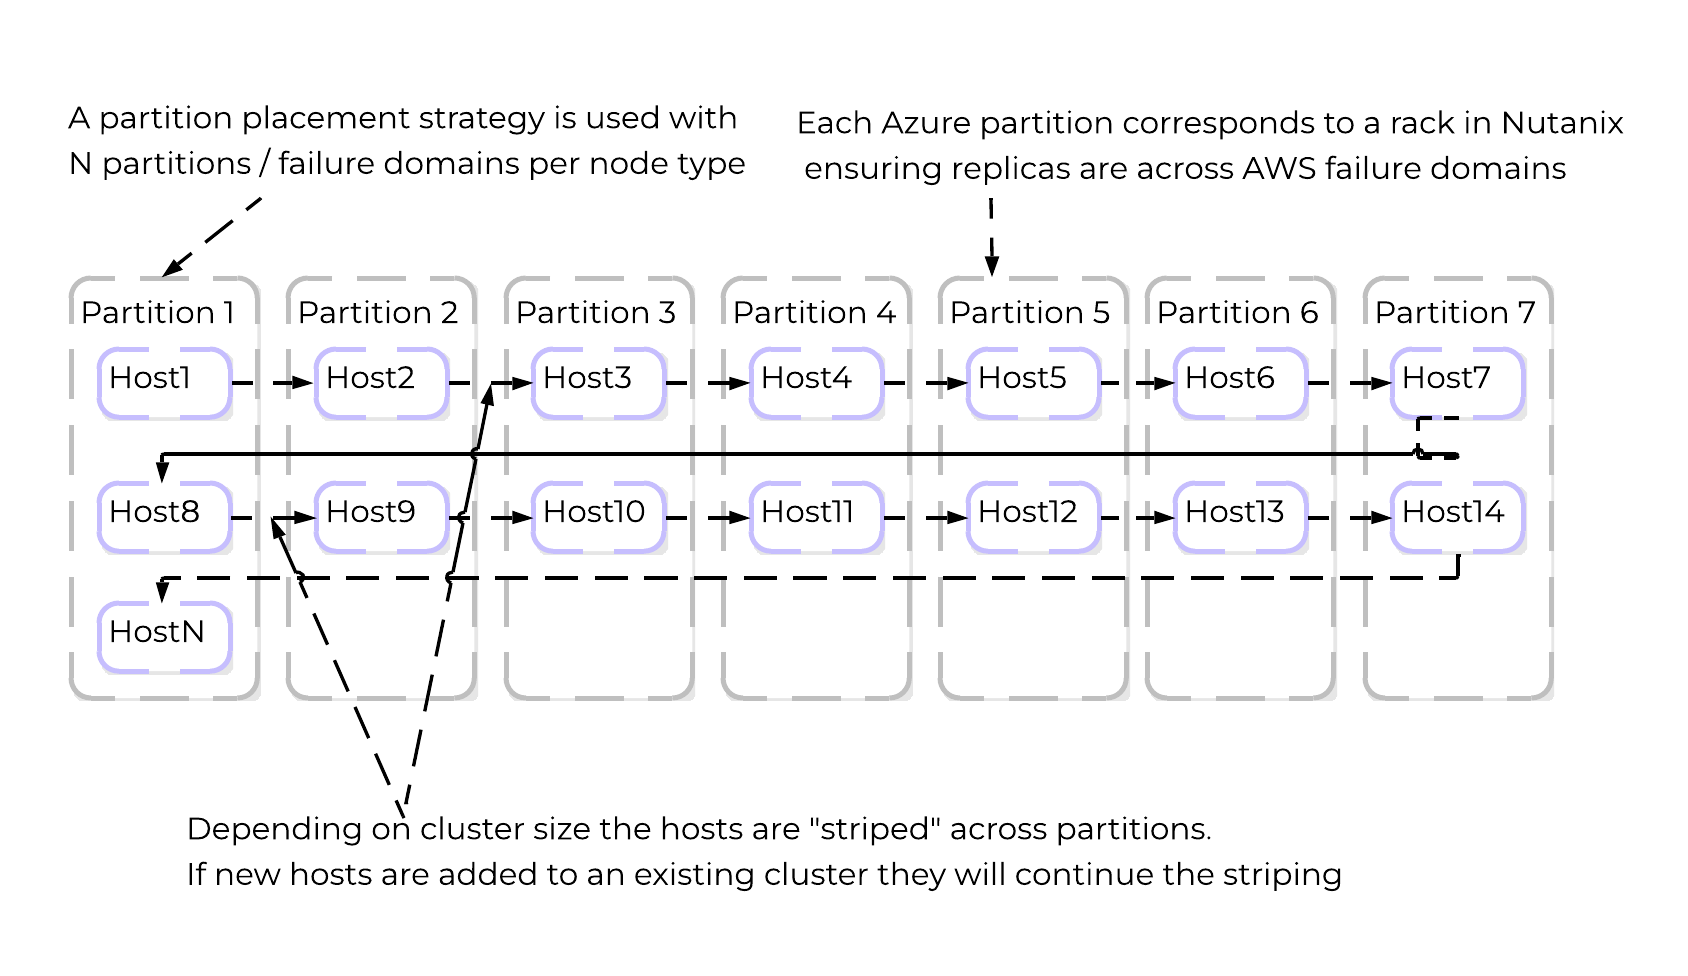 NC2 on Azure - Partition Placement
The number of racks in the cluster determines how many simultaneous rack failures the cluster survives. Erasure coding (EC-X) raises the minimum because parity strips consume an additional failure domain:
| Awareness type | Fault tolerance level | EC-X enabled | Minimum racks in the cluster | Simultaneous failure tolerance |
|---|---|---|---|---|
| Rack | 1 | No | 3 racks | 1 rack |
| Rack | 1 | Yes | 4 racks | 1 rack |
| Rack | 2 | No | 5 racks | 2 racks |
| Rack | 2 | Yes | 6 racks | 2 racks |
Replication factor 2 covers most workloads and needs a minimum of three nodes. Use replication factor 3, which needs a minimum of five nodes, when your availability requirements exceed what replication factor 2 provides. On AOS 7.0 and later you select cluster fault tolerance (CFT) instead: 1N/1D and 2N/2D protect against both node and drive failure, where redundancy factor protected against node failure alone. A few regions and availability zones do not offer RF3 or 2N/2D at all, so confirm the region before you design for it.
Core storage is the exact same as you’d expect on any Nutanix cluster, passing the “local” storage devices to the CVM to be leveraged by Stargate.
Given that the "local" storage is backed by the local flash, it is fully resilient in the event of a power outage.
New clusters installed with AOS 6.8.1 or later on NVMe-backed nodes enable Blockstore with SPDK by default. Stargate reaches the NVMe devices through SPDK APIs in user space rather than through the kernel block layer, which lowers latency and reduces the CPU cost of each I/O.
Responding to failures
The storage failure behavior is the same as on-premises, with one Azure-specific handoff at the end of the disk path. Each host relies on its local CVM for all storage requests. If a CVM hits an unrecoverable error, autopathing reroutes that host’s requests to a healthy CVM on another node and keeps redirecting until the local CVM recovers. Because the cluster has a global namespace and replicas of every extent, it serves those requests immediately. If the CVM stays down long enough, AOS re-replicates the affected data to restore the configured replication factor.
For disks, Stargate marks a device offline when it sees delayed responses to I/O. Hades removes the disk from the data path and runs smartctl checks. If the checks pass, Hades returns the disk to service. If the checks fail, or if Stargate marks the same disk offline three times in one hour, Hades starts the BMaaS removal process. That triggers an API call to the NC2 console, and AOS re-replicates the data from the failing disk across the remaining drives. Finishing the job is a manual step: start the node removal from the NC2 console to reclaim the capacity. You cannot stop or terminate a bare-metal instance from the Azure portal, and disk replace and repair functions in Prism Element are disabled for clusters running in Azure.
An availability zone can go offline for power, cooling, network, or scheduled maintenance reasons, and a cluster never spans availability zones. Protect against that failure domain with Nutanix Disaster Recovery to another on-premises cluster or to a second NC2 on Azure cluster in a different availability zone or region.
NC2 utilizes Flow Virtual Networking in Azure to create an overlay network to ease administration for Nutanix administrators and reduce networking constraints across Cloud vendors. Flow Virtual Networking is used to abstract the Azure native network by creating overlay virtual networks. On the one hand this abstracts the underlying network in Azure, while at the same time, it allows the network substrate (and its associated features and functionalities) to be consistent with the customer’s on-premises Nutanix deployments. You will be able to create new virtual networks (called Virtual Private Clouds or VPCs) within Nutanix, subnets in any address range, including those from the RFC1918 (private) address space and define DHCP, NAT, routing, and security policy right from the familiar Prism Central interface.
Flow Virtual Networking can mask or reduce Cloud constraints by providing an abstraction layer. As an example, Azure only allows for one delegated subnet per VNet. Subnet delegation enables you to designate a specific subnet for an Azure PaaS service of your choice that needs to be injected into your virtual network. NC2 needs a management subnet delegated to the Microsoft.BareMetal/AzureHostedService. Once your subnet is delegated to the BareMetal service the Clusters Portal will be able to use that subnet to deploy your Nutanix Cluster. The AzureHostedService is what the Clusters portal uses to deploy and configure networking on the bare-metal nodes.
Every subnet used for user native VM networking also needs to be delegated to the same service. Since a VNet can only have one delegated subnet, networking configuration would get out of hand with needing to peer VNets among each other to allow communication. With Flow Virtual Networking we can drastically reduce the amount of VNets needed to allow communication of the workloads running on Clusters and Azure. Flow Virtual Networking will allow you to create over 500 subnets while only consuming 1 Azure VNet.
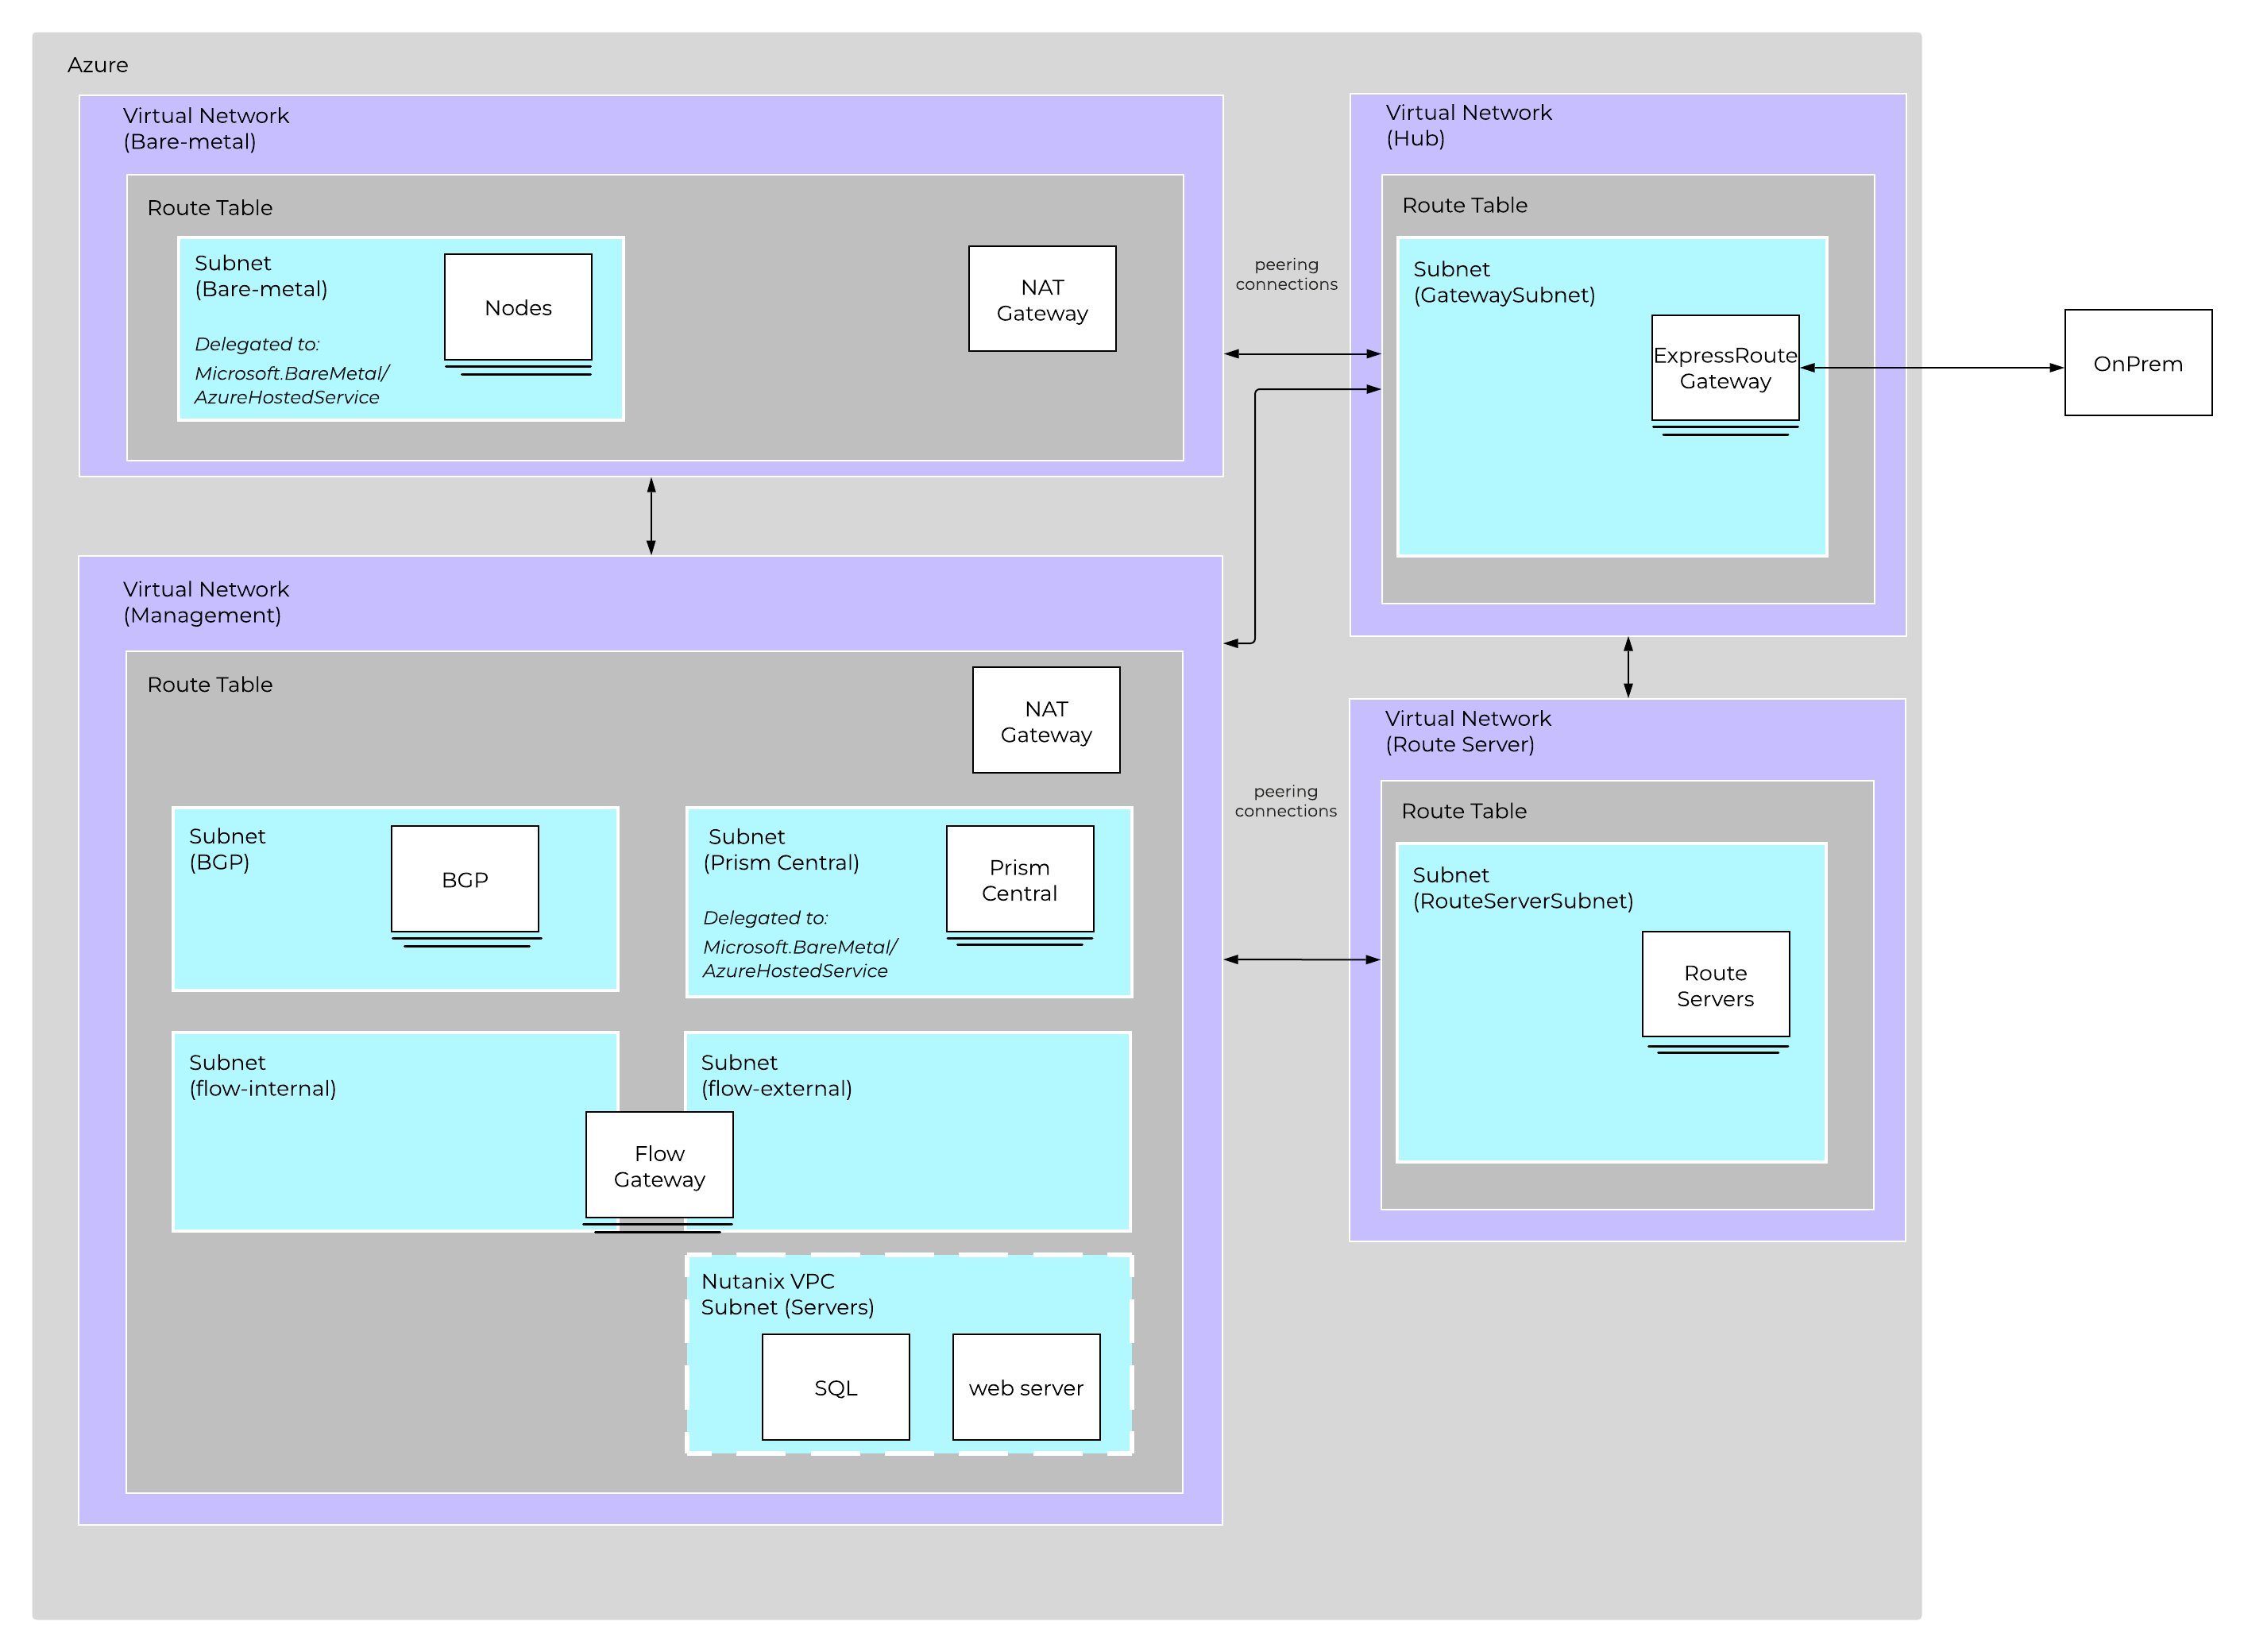
It is recommended to create a new VPC with associated subnets, NAT/Internet Gateways, etc. that fits into your corporate IP scheme. This is important if you ever plan to extend networks between VPCs (VPC peering), or to your existing WAN. I treat this as I would any site on the WAN.
Prism Central (PC) will be deployed onto the Nutanix Cluster after deployment. Prism Central contains the control plane for Flow Virtual Networking. The subnet for PC will be delegated to the Microsoft.BareMetal/AzureHostedService so native Azure networking can be used to distribute IPs for PC. Once PC is deployed, the Flow Gateway is deployed into the Prism Central VNet when you use ExpressRoute or Azure Virtual WAN, and into a dedicated Flow Gateway VNet when you use an active-active VPN. The Flow Gateway allows the User VMs using the Flow VPC(s) to communicate to native Azure services and allows the VMs to have parity with native Azure VMs, such as:
The Flow Gateway VM is responsible for all VM traffic going north and south bound from the cluster. During deployment you can pick different sizes for the Flow Gateway VM based on how much bandwidth you need. It’s important to realize that CVM replication between other CVMs and on-prem do not flow through the Flow Gateway VM so you don’t have to size for that traffic.
Flow Virtual Networking Gateway VM High Availability
When you deploy your first cluster you choose how many FGW VMs to create: a single gateway, or two to four gateways in a high availability configuration. Use high availability. With a single gateway, the NC2 console redeploys a replacement FGW VM with an identical configuration when it detects the original is down, and because that process calls several Azure APIs it can take around five minutes before the new VM forwards traffic. North-south traffic stops for that window. Running two or more gateways in an active-active configuration removes that gap and gives you a scale-out path when you need more north-south throughput.
The following workflow describes what happens when you turn off a FGW VM gracefully for planned events like updates.
For ungraceful or unplanned failures, the NC2 portal and Prism Central both have their own detection mechanisms based on keepalives. They take similar actions to those for the graceful or planned cases.
Network Address Translation (NAT): UVMs that want to communicate with AHV/CVM/PC and Azure resources will flow though the external network card on the Flow Gateway VM. The NAT provided uses native Azure address to ensure routing to all resources. User defined routes in Azure can be used to talk directly to Azure resources if using a NAT is not preferred. This allows for fresh installs to communicate with Azure right away but also gives customers options for more advanced configurations.
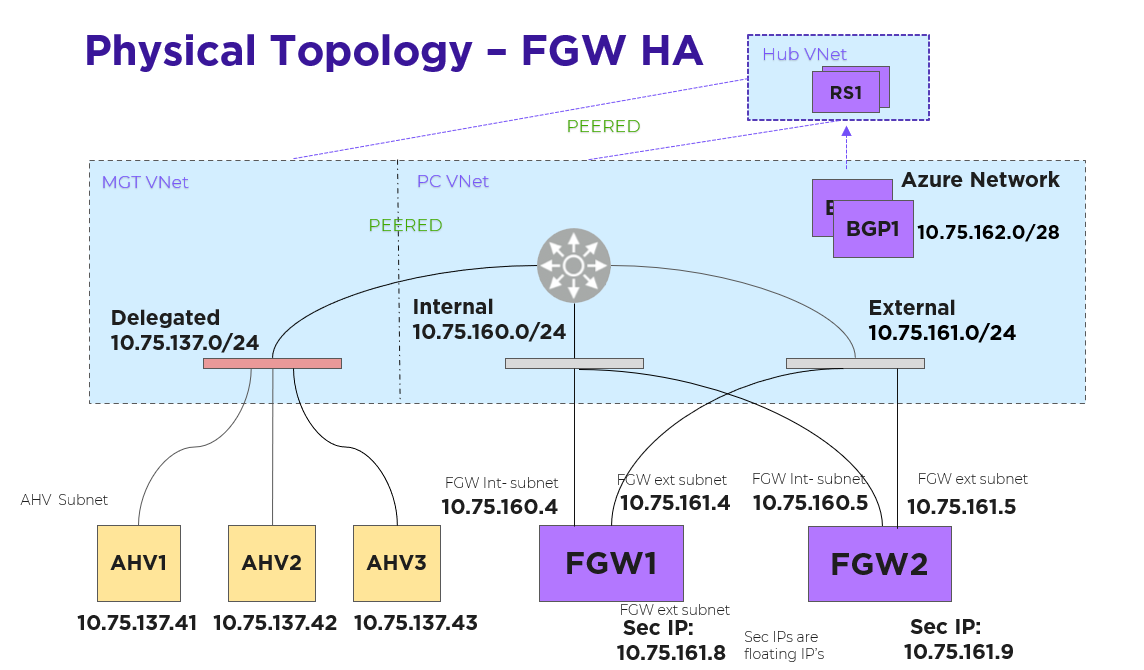
Each FGW instance has two NICs: one on the internal subnet that exchanges traffic with AHV and another on the external subnet that exchanges traffic with the Azure network. Each FGW instance registers with Prism Central and is added to the traffic path. A point-to-point external subnet is created for each FGW and the transit VPC is attached to it, with the FGW instance hosting the corresponding logical-router gateway port. In the following diagram, EN-NONAT1 and EN-NONAT2 are the point-to-point external subnets.
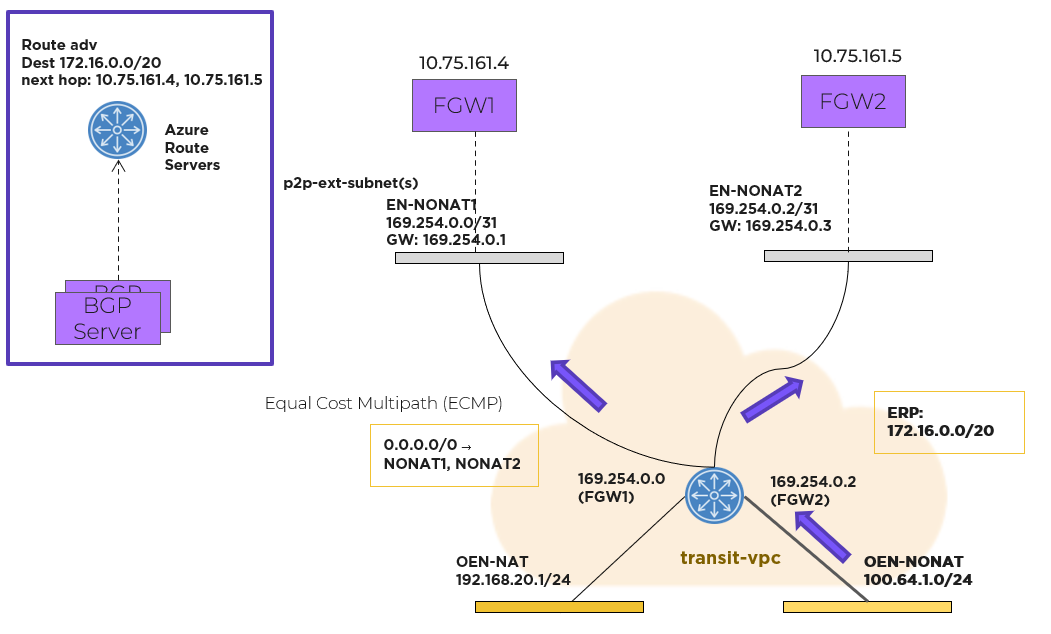
Flow Virtual Networking Gateway Using the NoNAT Path
For northbound traffic, the transit VPC has an equal-cost multi-path (ECMP) default route, with all the point-to-point external subnets as possible next hops. In this case, the transit VPC distributes traffic across multiple external subnets hosted on different FGWs.
For southbound traffic using more than one FGW, a Border Gateway Protocol (BGP) gateway is deployed as an Azure native VM instance. NC2 deploys two of these VMs, using Standard_D8s_v5 where the region has capacity and Standard_D3_v2 where it does not. The Azure Route Server deploys into the hub VNet that carries your hybrid connectivity: the ExpressRoute VNet when you use ExpressRoute, and the VPN VNet when you use an active-active VPN. With an Azure Route Server, you can exchange routing information directly through BGP between any network virtual appliance that supports BGP and the Azure VNet without the need to manually configure or maintain route tables.
The BGP gateway peers with the Azure Route Servers. The BGP gateway advertises the externally routable IP addresses to the Azure Route Server with each active FGW external IP address as the next hop. Externally routable IP addresses compose the address range that you’ve created and want advertised to the rest of the network in your Flow Virtual Networking user VPCs. Once the externally routable IP address is set in Prism Central at the user VPC, the Azure network distributes southbound packets across all the FGW instances.
Prism Central determines which FGW instance should host a given NAT IP address and then configures each NAT IP address as a secondary IP address on each FGW. Packets sourced from those IP addresses can be forwarded through the corresponding FGW only. No NAT traffic distributes across all FGWs.
NAT traffic originating from the Azure network and destined to a floating IP address goes to the FGW VM that owns the IP address because Azure knows which NIC currently has it.
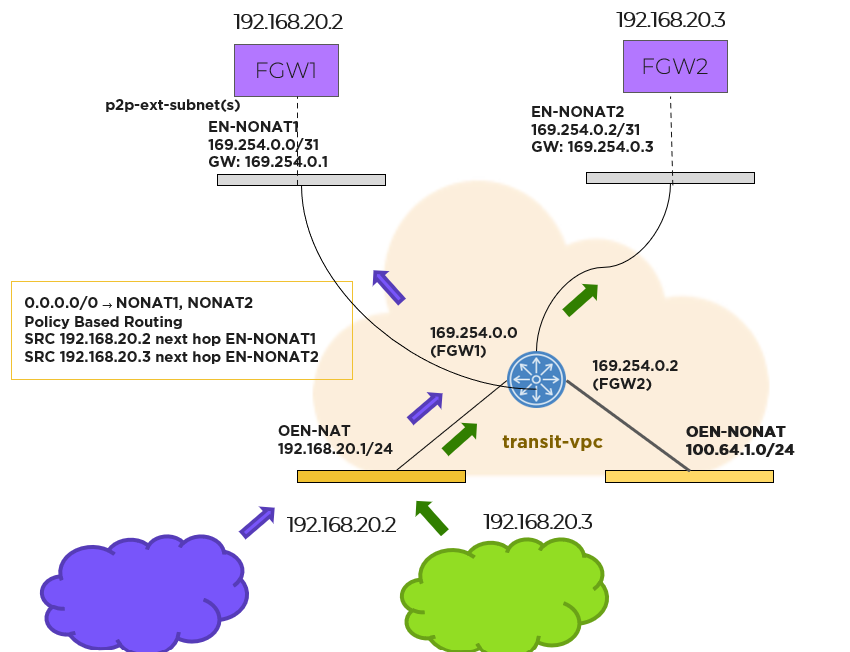
Prism Central uses policy-based routing to support forwarding based on the source IP address matching the floating IP address. The custom forwarding policy-based routing rules built into Flow Virtual Networking are used to auto install routes in the transit VPC.
Routing Methods for Scaled-Out Gateways
The Azure Route Server is not the only way to spread north-south traffic across a scaled-out gateway deployment. On the Flow Gateway tab, under Flow Network Route Advertisement > Routing Method, you choose between two methods:
The Routing Method option only appears when you select Prism Central 7.5 or later on the Prism Central tab and configure multiple Flow Gateway VMs on the Flow Networking tab. A single-gateway deployment has nothing to distribute traffic across, so the choice does not apply.
How the ILB gets built depends on the networking option you picked for the cluster:
The ILB sits in the same VNet as the Flow Gateway, in its own /28 subnet: the dedicated Flow Gateway VNet when you use a VPN, and the Prism Central VNet when you use ExpressRoute. It uses the Standard SKU with an Internal, Regional type and a dynamic frontend IP. The backend pool is the set of FGW external NICs, HA ports are enabled, and the health probe checks TCP port 22 every five seconds.
When you migrate from a single to a scaled-out Flow Gateway deployment, you can select the Internal Load Balancer routing method at that point. If you have already migrated using the Azure Route Server, you cannot switch to the Internal Load Balancer afterward. Decide the routing method before you migrate.
The hosts running on baremetal in Azure are traditional AHV hosts, and thus leverage the same OVS based network stack.
The following shows a high-level overview of a Azure AHV host’s OVS stack:
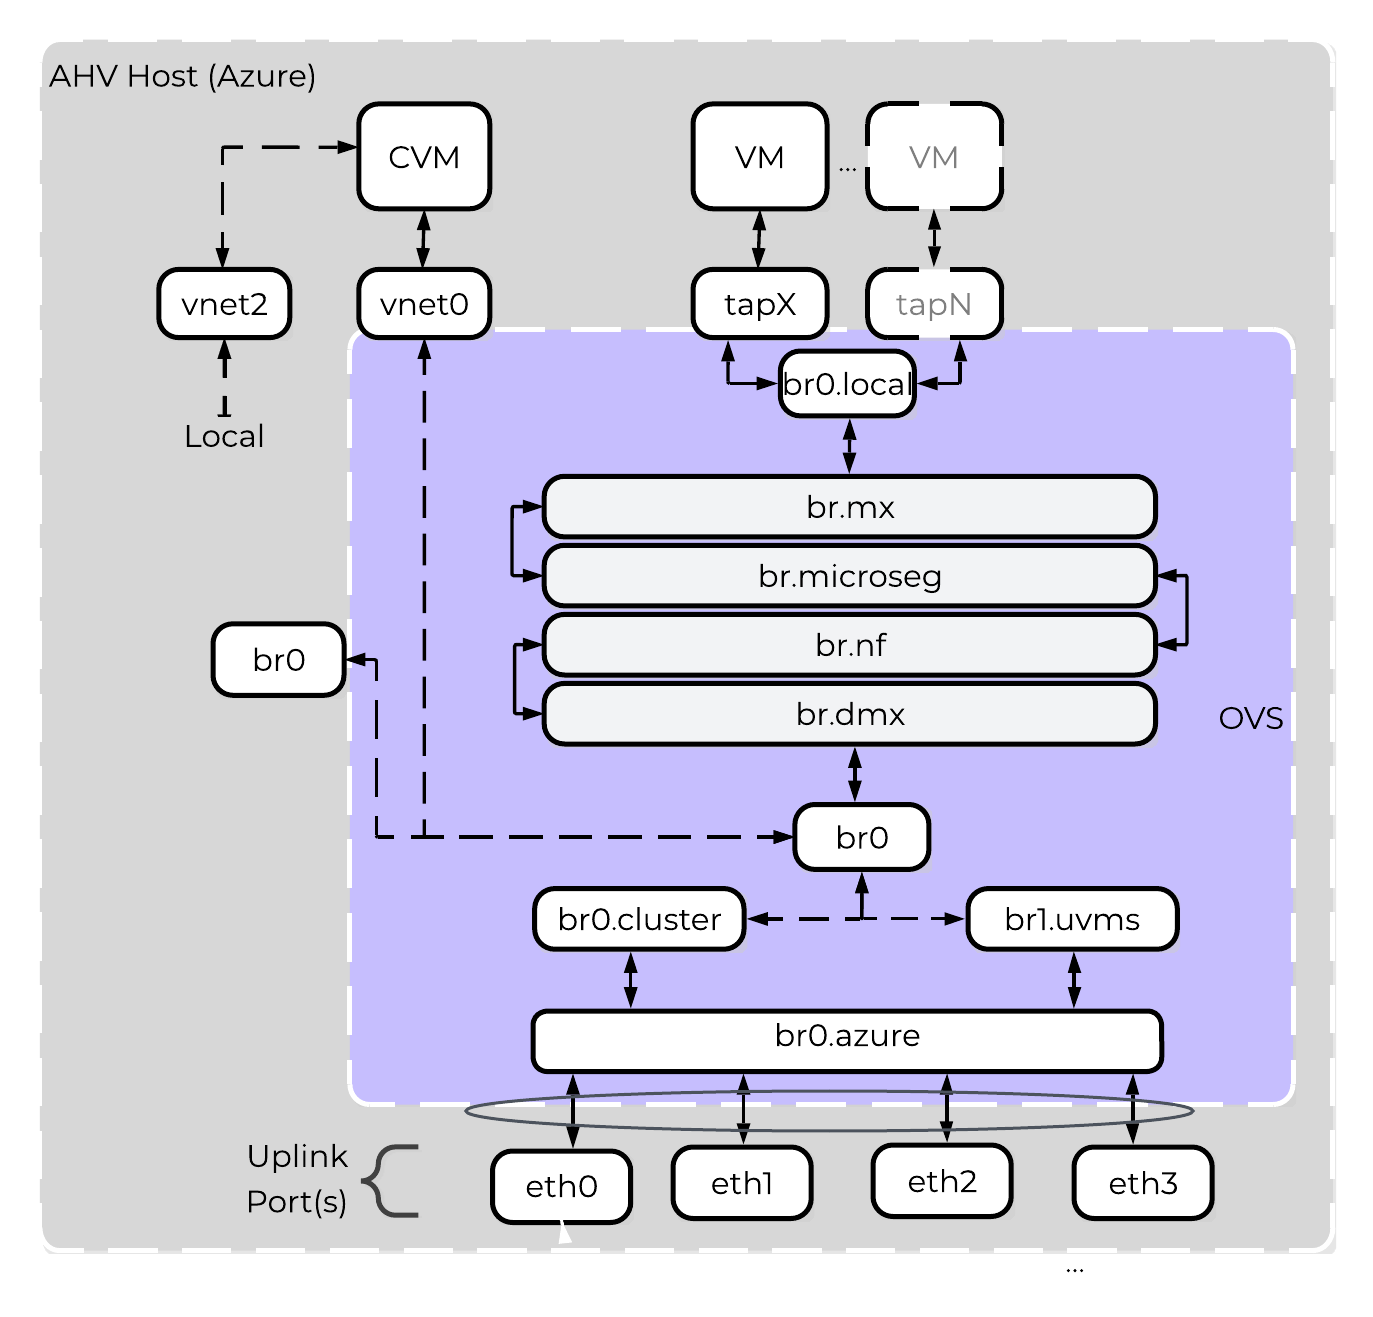 NC2 on Azure - Host Networking
Nutanix’s Open vSwitch implementation is very similar to the on-premises implementation. The above diagrams shows an internal architecture of the AHV that is deployed onto the bare-metal. Br0 bridge will split traffic between br0.cluster (AHV/CVM IPs) and br0.uvms(User VMs IPs).
For AHV/CVM traffic via br0.cluster, it will be a simple pass-through to br0.azure bridge, with no modification to data packets. The top of rack switching is providing the security for br0.cluster traffic. For UVM IPs traffic will flow via br0.uvms, OVS rules would be installed for vlan-id translation and pass-through traffic to br0.azure.
br0.azure will have OVS bond br0.azure-up which will form a bonded interface with bare-metal attached physical nics. Thus, br0.azure hides the bonded interface from br0.uvms and br0.cluster.
Subnets you create will have its own built in IPAM and you will have the option to stretch your network from on-prem into Azure. If outside applications need to talk directly your UVM inside the subnet you also have the option to assign floating IPs from a pool of IPs from Azure that will come from the external network of the Flow Gateway.
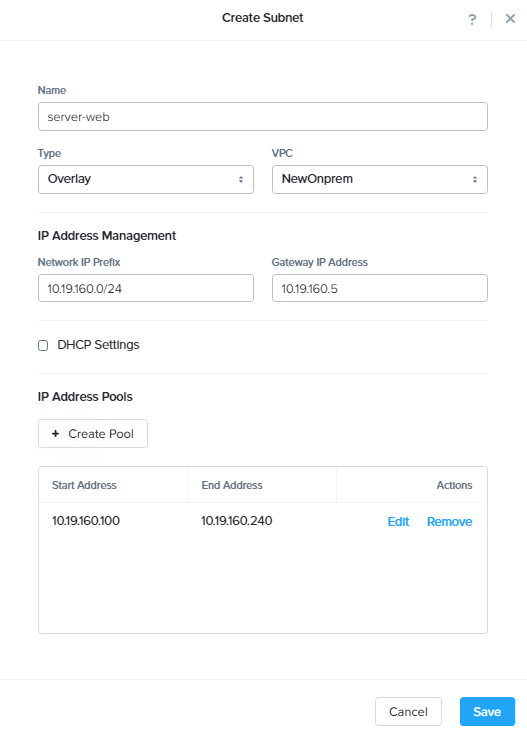 NC2 on Azure - IPAM with Azure
For a successful deployment, Nutanix Clusters needs outbound access to the NC2 portal, either using an NAT gateway or an on-prem VPN with outbound access. Your Nutanix cluster can sit in a private subnet that can only be accessed from your VPN, limiting exposure to your environment.
Multicloud Snapshot Technology (MST) replicates native Nutanix AOS snapshots directly to compatible object storage, including Azure Blob, AWS S3, Google Cloud Storage, and Nutanix Objects. The MST service runs alongside Prism Central. Use it to move snapshots you rarely touch, or snapshots of applications that tolerate longer recovery time objectives (RTOs), off primary storage and onto object storage that costs far less per terabyte. You recover those workloads through one of two models: zero-compute, an on-demand deployment of a Nutanix cluster on-premises or in Azure, or pilot-light, an on-demand expansion of a running NC2 deployment. MST requires AOS 7.3 and Prism Central 7.3 or later.
In the sections below, zero-compute and pilot-light describe disaster recovery where the source is on-premises and the target is cloud object storage. MST also replicates on-premises to on-premises through Nutanix Objects, and NC2 to NC2 through cloud object storage, but those scenarios are not classified as either model.
Zero compute is an on-demand Nutanix cluster deployment model where the MST service runs alongside the protected workloads. With this model in Azure, you replicate snapshots directly to Azure Blob Storage for storing and recovering less critical workloads that can accommodate longer RTOs. In a failover, you use the replicated snapshots to deploy an on-demand Nutanix cluster on-premises or in Azure for recovery. After the new cluster is up, you redeploy Prism Central and the MST service, MST restores its existing state from Azure Blob Storage, and you restore your VMs from Prism Central.
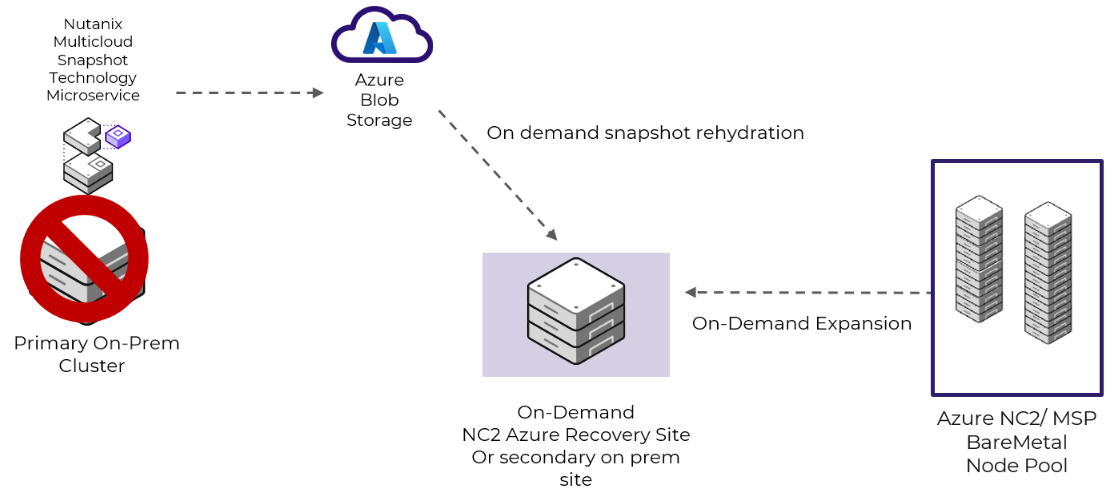 Zero-Compute Snapshot Storage with Multicloud Snapshot Technology
Automated recovery plans are not supported with the zero-compute model. You restore workloads manually. If you need an automated failover, use the pilot-light configuration instead.
In a pilot-light deployment, the MST service runs on an NC2 deployment with at least three nodes, and MST redirects the AOS snapshots to Azure Blob Storage. You can recover snapshots to the NC2 deployment, or back to the primary site if a healthy Nutanix cluster is available. If you need more space to recover the Blob-based snapshots into the NC2 deployment, add nodes to the cluster from the NC2 console or the NC2 console API, then resize the cluster back down once the failover is complete.
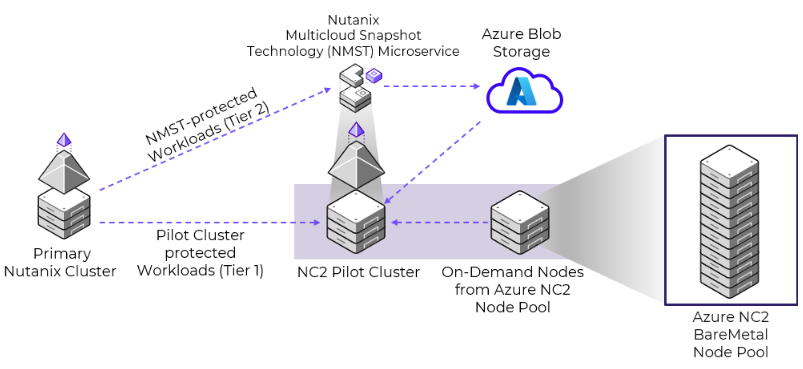
This model supports fast RTOs for tier-1 applications. It sends snapshots directly to the pilot cluster for quick restores and uses Azure Blob Storage for tier-2 application snapshots. The replication capability you get depends on where the workload is protected. Workloads protected by MST into Blob storage support asynchronous replication with a one-hour minimum RPO. Critical workloads replicated directly to the running pilot-light cluster support both NearSync, with a 1 to 15 minute RPO, and asynchronous replication.
In most cases deployments will not be just in Azure and will need to communicate with the external world (Other VNets, Internet or WAN).
For connecting VNets (in the same or different regions), you can use VPC peering which allows you to tunnel between VPCs. NOTE: you will need to ensure you follow WAN IP scheme best practices and there are no CIDR range overlaps between VNets / subnets.
For network expansion to on-premises / WAN, either a VNet gateway (tunnel) or Express Route can be leveraged.
Nutanix supports a native local key manager (LKM) for all clusters with three or more nodes. The LKM runs as a service distributed across the nodes, and you turn it on from Prism Element. Because it runs natively in the CVM, it is highly available, it upgrades in lockstep with the rest of the cluster, and it carries no per-node add-on pricing, so adding a node does not change your key management cost. Software encryption is native AES-256 data at rest, accelerated by Intel AES-NI. The first copy of the data, written locally, is encrypted, and so is the copy sent over the network to a remote node.
If you prefer to hold keys in an external service, AOS interoperates with any KMIP-compliant or TCG-compliant KMS server, and with Azure Key Vault.
Azure Key Vault
Starting with AOS 7.0 and Prism Central pc.2024.3, you can use Cloud Key Management Server to manage encryption keys in Azure Key Vault through Prism Central, for both on-premises clusters and NC2 on Azure. Configuring it takes four steps:
Once Cloud KMS is enabled, all key management operations, including changing or updating the KMS configuration, run from Prism Central.
VM high availability restarts guest VMs on another AHV host when a host fails, and it accounts for memory when it works out where the cluster has room to start them. It respects affinity and antiaffinity rules: a VM pinned to hosts 1 and 2 does not restart elsewhere when both are down unless the rule names an alternate host.
AHV offers two modes:
Guarantee mode reserves enough resources to protect against one host failure when all containers use replication factor 2, and two host failures when any container uses replication factor 3. The amount reserved depends on current cluster load and typically runs 1 to 1.25 times the resources used on the most heavily loaded host. When the failed host returns, its VMs migrate back to restore data locality.
A few points are worth holding onto:
The Acropolis Dynamic Scheduler (ADS) manages CPU, memory, and storage resource availability for VMs and volume groups, and it enforces the affinity policies you define either by hand or through a VM provisioning workflow.
VM-host affinity keeps a VM on a specific set of AHV hosts. It exists for cases like application licensing or a dependency on particular host resources. It is a must rule, and AHV always honors it, which is exactly why it costs you scheduling flexibility and blocks VM high availability. Avoid it.
VM-VM antiaffinity keeps two or more VMs off the same host. Use it when an application provides its own high availability and no single AHV host should become that application’s single point of failure. It is a should rule: AHV honors it when it has the resources to place the VMs on separate hosts.
The following sections cover how to configure and leverage NC2 on Azure.
The high-level process can be characterized into the following high-level steps:
If you let NC2 create the networking resources, the console builds the VNets, subnets, and NAT gateways for you and you are done at step 7. If you bring your own networking, insert the following between steps 5 and 6:
More to come!
©2025 Nutanix, Inc. All rights reserved. Nutanix, the Nutanix logo and all Nutanix product and service names mentioned are registered trademarks or trademarks of Nutanix, Inc. in the United States and other countries. All other brand names mentioned are for identification purposes only and may be the trademarks of their respective holder(s).